Friday, May 23, 2008

Finished: Lilac Cherry Cardigan

As promised, here she is, the finished Cherry cardigan!

Pattern: Cherry Cardigan from My Fashionable Life
Yarn: Jaegar Aqua 100% cotton, 7 and a bit skeins
Needles: US6 and US3

The is going to be a very wearable knit - it's springy, feminine, good with jeans or skirts, buttoned up or open. The eyelet detail along the waistband is a nice touch, so you can weave in any tie or ribbon you like. As you can tell, I'm quite happy with it - I've been parading it around Columbus the past week, and I think it will be coming on holiday with me as well. The pattern is from My Fashionable Life and is easy to follow - I'll hopefully be making a couple more using the basic instructions, but maybe with another motif. Amazingly, I was even able to make a few adjustments without any major catastrophe. My mods: I swatched and got a tighter gauge than required, so instead of going up a couple of needle sizes (memories of the disaster with the Drops jacket), I just knit a bigger size that fortunately gave me the right measurements. Second, I knit the body to 14" long instead of 15", because I am short-waisted and noticed that the waist detail on other Cherries sat fairly low. The whole cardigan is knit in Jaegar Aqua, and took about 8 skeins total on US6 and US3 needles. The buttons and ribbon (the only roll of matching ribbon in the entire store) are from Joann, and although I originally wanted a grosgrain ribbon, the sheer one with blue trim has been holding up just fine. Seaming, as usual, was a pain, particularly setting the sleeves. Somehow, my sleeves were a bit on the tight side, so if I were to knit this again I would probably make them a tad bigger (I guess I have big arms). Next time I'll probably knit the back and sides as one pieces to reduce seaming.

I had artistic intentions of photographing Cherry at the park, but impatience and time constraints meant cleaning off (i.e. shoving to the side) the windowsill and snapping a few pictures with my webcam so that I could blog about it before my trip. They're a little washed out, but what can one do without a full time fashion photographer and one's beck and call? I'll be sure to get D to take a few pics in a nice garden in France.

From the back: Birdie pattern

We arrived in Toronto yesterday (leaving poor Gatsby behind) and will be spending a few days here before our flight to Europe. Before we left, I borrowed a whole bunch of audio books from the library (which, as usual, shocked me with their vast selection) including Julia Child's My Life in France, Inflight Croatian, Italian 101, basic French, and Paris Walks. So far we are really enjoying the Childs memoir, which should keep us entertained on the flight - she lived such an interesting life, and the descriptions of her Paris experiences are wonderful.

I have one more blog post I can put up before we leave, so check back here to see the efforts of my first jewelry class!


Wednesday, May 21, 2008

Mini Choco-cakes!

You've seen these before. More chocolate fudgy yummies, now in mini form. With chocolate ganache and sprinkles!

Eat me! Eat me!

This is probably the shortest post ever...but it's been a long day, and Top Chef is on, so I'm going to go veg for a bit. Knitting update soon!

Monday, May 19, 2008

Lemon Tarts


We're back from a weekend of camping festivities and of course, eating way too much. The weather was a little chilly, but thankfully much nicer than we'd anticipated - I'd pictured myself hiding in the tent as rain crashed down on us in buckets. Luckily the sun decided to come out and play, which meant we had a good campfire going and lots of outdoor cooking. There were the good old camping staples: hot dogs and s'mores, bacon and eggs, along with some more exciting things like lemon dill fish, bulgogi, bannick bread, finger jello, popcorn, blueberry muffins, chocolate crinkle cookies...

And what's a camping trip without lemon tarts:

The tartest lemon custard ever...no wonder they all disappeared

They're not as hard to transport as one might expect. They kept well in the tart pan inside a big tupperware and made for a nice treat with afternoon tea next to the camp fire.

Anyhow, I am very pleased with how these tarts turned out, and I will definitely be making them again. Once again, the recipe is courtesy of Restaurant Widow and you can find it right here. The lemon custard is super easy to make and doesn't involve any cooking before pouring into the tart pans. My subs: graham cracker crust for the ginger snap one (although I'm sure the ginger snaps would have been more delicious) because of the last crust disaster I had, and pressed them into 6 four-inch tart pans. There was enough lemon custard to fill 5 of the crusts, so I now have an extra one in the fridge. The most challenging part of this recipe was patiently waiting for the tarts to cool and chill for 4 hours:

Now that we're back, it's time to start getting ready for our big trip which is coming up very soon! A few little details to look after, some packing, and then we're set. My Amazon.com order arrived today so we now have some guidebooks to keep us going - happy Monday everyone!

Friday, May 16, 2008

You'd be in a tizzy too...

...if you had to deliver two birthday cakes by 12pm today, and at 9am all you had was one baked cake.

Eek, the mess. Buttercream and icing sugar everywhere. This would have been a relaxing and satisfying project had I not misread the new email request that cake bakers drop off their cakes by 12:00 noon the previous day. Usually, I'd have until 4pm to get things done. And feeling a little ambitious with my bakery ventures of late, I felt pretty sure I could do two cakes without too much difficulty.

Suddenly the week whizzed by and hadn't even baked the damn things, not to mention made the icing. One cake did not survive coming out of the pan, so I had to make a third one...grumble. This morning I got up and baked my second cake before D was even out of the shower, and I made up all the icing I'd need in a couple batches (I really need some bigger mixing bowls).

Despite the rush I was in, I was determined to take a few pictures. They're a little dark, but it was the best I could do. They are fairly traditional-looking cakes but it gave me a chance to practice piping borders and flowers again. I did one of those S scroll borders, and made the two-toned roses by putting in both yellow and pink icing into the piping bag - the consistency was a little thin, but I didn't have time to redo the bag so I kept going. I used one of those scraping tools with the teeth for the sides, which was much harder to do than I expected. I think a turning table would have made it easier. I managed to dash out of the house at 12:10 and get them there only 20 minutes late. Luckily it was not a big deal. Anyway, it's been a while since I've made any birthday cakes, and it'll be another while before I get to do more since I'll be vacationing soon.

Oh, and here's my progress from my last jewelry class. We hand-sawed out our shapes, and next week we'll file them down so they are less wonky looking and have nice smooth edges. Sawing is hard work! Between pottery and jewelry, my arms are getting a good work out.

We're going camping this weekend, so won't be posting until I get back - have a great weekend and wish us good weather!

Thursday, May 15, 2008

Pottery Week 10 & 11: Wheel-throwing

I know you have all been dying to see my lovely thrown pottery. After all, I do call myself Knitticrafty and seem to be quite competent at most crafts I pick up. Especially after our successful first wheel-throwing attempt back in December when we visited Deep River.

Well, it turns out that was mostly beginner's luck... last Saturday D and I had our first throwing class, and we went again on Tuesday night. Our instructor gave us a demo on the wheel, and ziipp ziiipp ziiipppp in three easy motions managed to pull up a decent looking pot! Wow! I was encouraged. The steps were: cone up & down, form the base, pull up the side. To master the techniques of throwing, each student in the class must be able to throw five 8" tall cylinders of consistent thickness in order to begin making and keeping thrown objects. D and I each started with four good-sized balls of clay to practice with. Off we went!

Here are my first two tries. Oh dear.

Wobble bobble...

Centering the clay is one of the most challenging steps and it is essential that you be able to centre your clay constantly to prevent wonky looking messes like this:

Practicing making spouts on my third mangled pot

After about 3 balls, my arms were feeling pretty wimpy so I packed it up. D however, persisted and seemed to do quite well for his first try! Here he is, pleased as punch.


The best pot of the day

This is why we're not allowed to keep anything yet...

Tuesday night saw some improvements, with both of us managing to get our cylinders a little taller (6"), but they would all somehow end up too thick at the bottom and too thin on top. One woman in our class completed her 5th cylinder that night, and there was a lot of whooping and cheering. Since we spent all our time throwing, glazing our other pots were put on hold. I did get my pear back, which turned out to be a surprising shade of brown instead of the nice greenish colour I'd thought I'd chosen. Glaze is such a mystery...

A nice Bosc pear instead of a Bartlett.


Monday, May 12, 2008

Do-it-Yourself Jeni's Ice Cream!


No joke. Last week I discovered from my favourite blog that Jeni's Ice Cream was featured in this month's Food & Wine magazine, along with a handful of do-it-yourself recipes for the home kitchen! If you have ever had Jeni's, you would know that her ice creams are amazing. It is one of the best things about Columbus. Find the article here.

I have had my ice cream maker since ...um, 2002 (?!) and have only used it a handful of times because of the fussiness of homemade ice cream. No matter which recipe I used, how much fat content was in the cream or milk, the finished product maintained the right consistency for only a short period of time - immediately after churning. As soon as it went into the freezer it became an impossible-to-scoop ice rock, and defrosting just resulted in crystally creamy chips that couldn't be characterized as scoopable. Are you ready for this? Jeni's recipe overcomes all of these problems. Really.


I made the vanilla ice cream, which turned out wonderfully - smooth texture, free of ice crystals, perfectly creamy and scoopable even after several hours of freezing. We are definitely being let in on some trade secrets here! It was really easy to make too -no egg yolks to worry about cooking.

The top photo could have potentially looked tastier if it had been taken a little earlier in the afternoon when there was more natural light. Unfortunately I had to rush off to work (two more days left!) and didn't have a have any ice cream until after dinner. Also missing was a proper ice cream scoop, which is funny because we have so many kitchen utensils we probably use far less. With a soup spoon, I scooped a long, curved strip that doubled back on itself, then took a little scoop to pat over the hollow middle. This was the fake-out technique I learned back in highschool when I had a part time job scooping ice cream at the local Baskin Robbins - the goal was to make a 4 oz scoop look as big as possible - my mother was always appalled at this trickery. Admittedly, I think it was pretty clever.

For my next batch, I'm going to follow Restaurant Widow's suggestion of adding espresso powder...mmm.

On a final note, I chatted with the bakery owner this morning and told him how much I enjoyed working in the kitchen. I received a rather glowing review of my performance on Sunday, which was that although I started off slow, I picked up the pace and held my own. And apparently I was competent enough that the pastry chef said, "she knows her stuff". I did a little happy dance at that.

Sunday, May 11, 2008

The Inaugural Bakery Day

Happy Mother's Day to all the mommies!

OK, so I didn't make this, but I made something VERY similar today!
Fruit tart from Cakes Etc.


The bakery cafe I work at is extremely popular on Mother's Day. Today was absolute insanity in the front of the house - it was loud, crowded, hot and hectic. Usually, I would be out there doing counter service: ringing up coffees and desserts, bagging, plating, drink-making, answering the phone, brewing more coffee, folding boxes, rolling endless cutlery, smiling and generally trying to be polite and nice to the customers.

Lucky for me, today was my first day working in the pastry kitchen. I was so glad to be working in the back, quietly decorating dozens and dozens of pastries and cakes that we would go through by the end of the day. Perhaps it was the novelty, but I had so much fun on my shift and had a chance to do much more than I'd expected, with very little supervision!

What I did in the kitchen today starting at 7:00am:

1) Decorate 4 cheesecakes - two whole, two already sliced (so clever, the fruit goes on the slice so it's not all squished with cutting!) Take sliced kiwis, strawberries, mandarin oranges and line them up all pretty around the cake and put on two coats of apricoty fruit glaze. The glaze wasn't as gross as I'd expected - I think it only looks congealed when it is put on too thick. Put toasted almonds all along the sides, wrap the slices with wax paper and reassemble the cake.

2) Assemble fruit tartlets: take shortbread crusts, paint them with melted chocolate (using a HUGE brush, why don't they have little ones?), pipe in pastry cream, top with kiwis, strawberries, oranges, glaze, put them in cupcake liners.

3) Finish a chocolate roulade cake: cover in chocolate buttercream, scrapes lines along length (this has a name, I think), sprinkle with chocolate shavings, pipe rosettes and leaves, then slice diagonally and separate with wax papers

4) Assemble cannolis: Ok, I was a little disappointed to learn that they buy pre-made cannoli shells. But apparently this is common. Pipe cannoli filling into shells, dip each end in chocolate vermicelli and put them in little papers

5) Decorate little custard cakes: Cut out of mold, plop in cupcake liner, top with a fanned strawberry and glaze (they really like glaze)

6 Cover rumballs with coconut

7) Roll marzipan fruit in sugar

8) Write birthday signs for lots of birthday cakes, decorate various cakes with the signs and pre-made flowers

9) Pipe borders and airbrush pre-made flowers in pastel colours for a girl's birthday cake. I did a lousy job on the writing the first time and the pastry chef had to scrape off the whole thing and we started over (I don't think I got in trouble though). Airbrushing was really messy, but kind of fun! My hands are covered in dye.

...and I finished up at about 12:00pm. What a fun day!! I was semi-worried I'd get stuck doing dishes or something lame, but they kept their word and actually let me near the pastries. So, I'm very pleased about that. I'm not sure what happens at this point - this might be my last shift before going on holiday, but hopefully I'll get to do this again when I come back.

Wednesday, May 7, 2008

Wednesday Crafty Update

What's this! A combo jewelry-and-knitting post, you lucky folks!

Today was our second jewelry class which was much more satisfying than the first week considering we actually got to do some real metal work (and make a huge racket while hammering our projects). Our class demo today was: Sawing. And being the safety gal I am, I wore safety glasses for fear that fine metal dust would get in my eyes (thereby preventing me from ever being able to enter an MRI scanner). Better safe than scanless. We also had a demo on operating the drill press, which was pretty much how I remembered it from Grade 8 shop class, but with a few additional steps that will keep our metals looking nice and unmangled.

Sawing free-hand through brass - more difficult than you'd think

Here is my copper, all hammered with lovely little dents. I only hit my thumb once while flattening it out with a rawhide mallet (somewhere on Zarafa's blog, there is probably a picture of my hammer in motion). Next week we glue our paper template to the metal and start sawing! It doesn't seem like much for 3 hours time, but there was a lot of sitting around and waiting for the instructor to come by. While I do like the relaxed feel of the class, sometimes you can't get the direction you need quickly. It's a trade off, I guess - it's probably more enjoyable when you're a more experience student.

This weekend is the student art show at the CAC - there are some amazingly talented students displaying their projects, so stop by and check it out if you have a chance. After class, as a reward for our finger-jeopardizing work, we stopped by Pistachia Vera for a treat - lemon pine nut tart and coffee, mmm.

Knittingwise, Cherry is just one front panel short of being assembled. I finished the sleeves on the weekend and blocked the pieces last night. The pattern looks great after blocking - I'm excited to see how it looks all seamed up. Almost there...

On the work front, things are changing again. Some good and not-great news. In addition to leaving the private practice, it seems I might be leaving the bakery cafe too. My counter-help-in-exchange-for-pastry-work deal with the owner hasn't really panned out the way I'd hoped. He's had plenty of excuses, some legitimate, but none that motivate me to help him out any more than I need to.

The only pastry experience he's offered me is on weekends, so I'll be going in this Sunday to show him what I can do and see if it will be a mutually beneficial arrangement (i.e. I like it enough to give up my weekends). Apparently, if I'm any good, he says he might be able to give me a pastry shift on a week day. Honestly, how do you expect to keep your staff this way? After this weekend, it's hard to say if I'll be going back since I'm also taking a long vacation very soon.

The good news is that after I come back from vacation, I will be doing some freelance cake decorating for a lovely little bake shop on an as-needed basis. Very, very excited about that!

Monday, May 5, 2008

Angoras and Alpacas: Cutest Post Ever

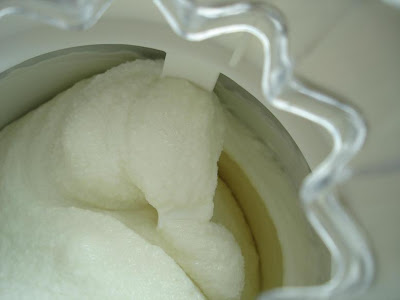
Did you ever wonder where that luxurious angora yarn comes from? Look no further than this fuzzy white blob in the photo. This is a recently groomed English (or possibly Giant) Angora rabbit stil sitting on its brushing stand, having just had a nice blow-out from its owner. So pampered.

This past Sunday Zarafa, Mr. Z, Sonja and I took a little field trip to the Ohio State Rabbit Breeder's Show & Sale, followed by a brief visit to the Buckeye Alpaca Show, all at the Ohio Expo Center (D and J declined to participate in the fuzzy cute fun - I think they felt threatened). Apparently this was the biggest state show, with about 5000 bunnies being exhibited. I have never seen so many rabbits in my life - and such an enormous variety! You realize how completely clueless you can be about something until you see it for yourself. I don't think I've gushed so much about animals. Ever. We had lots of fun to say the least, and the whole thing was made more enjoyable and educational by Mr. Z's rabbit expertise.

Are these not the cutest rabbits you have ever seen??


From Top Left: French Angora (probably), Flemish Giant,
English Angora, Dutch, American Fuzzy Lop,
Jersey Wooly (or young French/Satin Angora)

And then there was this little bunny was just hanging out on the camping chair, chilling. No sign that it was about to make a break for it. I wish Gatsby could behave so well. On our way out from the rabbit show, we passed some vendors selling rabbity goods including rabbit snack sticks, rabbit jerky, rabbit sausage, rabbit pelts and more. It felt a little wrong to be eating the bunny, but I suppose it is a means of sustainability - nothing goes to waste.

Afterward, we stopped by the Alpaca show to see if we could score some luscious yarn. Indeed we did. But first we actually had a look around at the alpacas and chatted with some of their breeders. They are the funniest creatures with their long gangly necks and all. Some of them had the most beautiful multi-coloured coats - I think Zarafa and I were both thinking the same thing "Hmm, which alpaca would give me the most variety in yarn colours?". The Suri alpaca was quite pretty too, in a funny sort of way. Their coats were almost rope-like, and looked like a semi-spun yarn. Up until Sunday, I thought Suri was a brand name. Oh, the ignorance.

Hanging out by the fan: "It's too hot with our coats on"

This is what I bought at the show: 600 yards of soft, squishy lovely alpaca - for $29! I thought it was a pretty good deal. I think I'll save it for winter knitting and make an extra long scarf out of it.


Hope you all had a nice weekend too!

Saturday, May 3, 2008

Pottery Week 9 - a Mishmash

Lots of fun things this past week! Viennese chocolates and fancy tea arriving in the mail were a lovely surprise (thanks Hazel and Kevin!) We were FINALLY reimbursed for our lost valet parking key (only 3 months later). I also went to my first jewelry class, which was a bit weird since I was the only new student. I did, however, briefly wield a blow torch, flame some copper, dunk it in some 'pickle' (an acidic solution - thereby annealing it) and practice some stamping without injuring myself. Our first project will be a slot and tab bracelet, which I am supposed to draw for homework. Unsurprisingly, I haven't done it yet.

Today, D and I started the second session of our pottery class. We did a bit more hand building - slabs and pinch pots - and next week we'll be learning how to throw on the the wheel! Very excited for that. Here are a few pictures to entertain you with:

D made these lovely little vases by pinching two bowl-shapes, joining them together and sealing them to form an enclosed oval. He paddled the sides with a wooden stick tool to create the sections. Unfortunately, only one survived the transport to the drying shelf - again reflecting the delicate and frustrating nature of pottery work.

I made a few more slab pots using molds, which I am planning to slip-paint next week:

After class, we had some excellent sandwiches at the Brown Bag Deli in German Village, followed by coffee and sweets at Yosick's Artisan Chocolates and pastry shop. On one side of the shop they had a nice assortment of self-serve traditional bakery goodies including cookies, macaroons, cupcakes, scones, turnovers, biscotti, brownies and more. I had a raspberry lemon friand and D had two mint chocolate truffles (which he said were fantastic) - they make all their chocolates on premises using only Belgian chocolate and adding caramel or honey to sweeten. The owner does all the baking herself as well. Drop by for a coffee and treat!


Then tomorrow, I am going to see a Bunny show at the Ohio Expo Center and possibly an alpaca show too - I am secretly hoping to find to soft angora or alpaca yarn to take home with me.