Showing posts with label Quilting. Show all posts

Sunday, August 15, 2010

Baby Lily's Quilt

I can finally blog about a little project that has been completed since early July! It's another version of the stacked coins baby quilt, this time using a pattern from Oh Fransson (which is actually featured in Sew Mama Sew). This past summer I have been doing more quilting, and I read Elizabeth Hartman's blog quite often - she's great with colours, and her designs are modern and fun.

Baby Lily was born on June 21, and I wanted to give her something handmade that would be useful (I'm sure she received a ton of clothes, bibs and stuffed toys) so a personalized baby quilt fit the bill. It turned out a little bit smaller than I expected, so I added an extra two rows of off-white sashing to increase the size somewhat. It's just the right size for the park, or using in the stroller. At the time, I didn't know if Baby Lily would be a boy or a girl, so I chose rainbow colours to keep it sort of neutral but not too boring. I love the animal fabric! Lorah said her nursery had a safari/animal theme going on so it seemed like a perfect fit.

I used stippling again to quilt the whole thing. This time, I made my designs much bigger so that there wouldn't be as much thread going onto it - the last one I made felt really heavy, probably because it was so densely quilted.
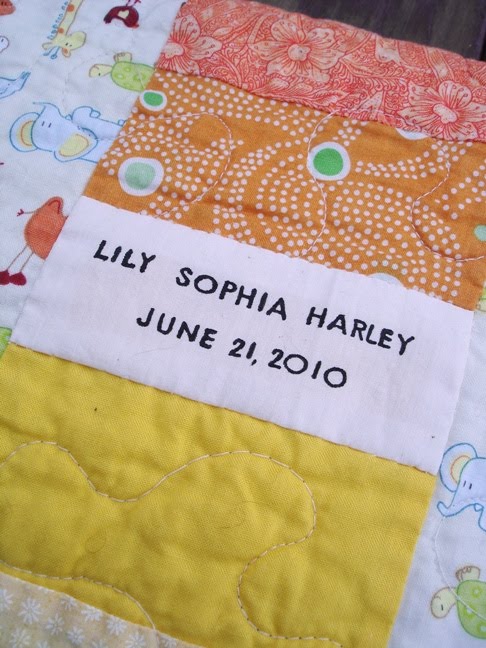
Some acrylic paint and stamps to put the name and date on...

Here's the back, with just a narrow strip of coins. This is my second baby quilt, and I'm still figuring out how to get the pieces lined up straight. Is it just practice? I thought I had cut and sewn so carefully, but still things turned out wonky and I had to rip out stitches and try again and again. I even pinned! The sashing is hard to get straight. Maybe next time I have to line it up square by square instead of just judging by the ends of each strip.

I did finish a third quilt, the Red Triangles, but I forgot to take a picture of the finished project, and now it's found a new home at my mom's house. I can show you the quilt top at some point...I do have a pic of that.

We just got home from our Canada trip - JJ had a great time visiting everyone. She grew up a lot during the vacation - learned how to sit up, eat from a spoon, and even took a dip in the river!

Monday, February 15, 2010

More Quilting! This time, a Flock of Red

Last week I started another crib-sized quilt, the Flock of Triangles quilt, which is a Denise Schmidt pattern based on a traditional quilting pattern called Flying Geese. I just googled it and found a free pattern for it online - right here. I bought the book last year and this is actually the first time I've made something out of it.

Pretty!!

I was inspired after seeing a blue and white version at a friend's house, and, remembering that it was in my pattern book, I decided to try one myself. The only rules were that it had to be made from fabric that currently exists in my stash. I could have gone with green and white, but the red looked more fun. Plus it's pretty much the perfect month for lots of red, with Valentine's day, Chinese New Year and the Vancouver Olympics.

This time, I actually cut out ALL the pieces for the quilt top at once. I see why quilters suggest you do that - now I'm committed to sewing all those suckers together! Unlike with the snowball quilt, I cut and sewed bit by bit, and got bored 2/3 the way through and ended up abandoning the plan for a queen-size quilt for a wee-sized one.

So, I cut out the pieces over a few days, and then laid out all the triangles in the order I was going to sew them. Stitching the triangles together is a little tricky because they're sewn on the bias instead of the grain, which makes them stretchy and a little fussy to iron. And, you line up the pieces to sew within a 1/4" seam, which does NOT mean just lining up point to point...I found this out after stitching a whole row of triangles and had to go back and rip the damn thing out. The even-feed foot has been a huge help, and after about 9 rows I'm finally getting the hang of it.

Here's my progress so far - only 3 more rows to go! Then I have to figure out what to do about the quilt backing. I only planned for the quilt top, and not the bottom. It might require a dangerous trip to the craft store...uh oh.

Friday, February 12, 2010

The Snowball Crib Quilt

Thought J.J. arrived in my blogging absence, didn't you?

Nope. She's waiting until she's good and ready. In the meantime, I've actually been quite productive with crafting, and just haven't had a chance to post much. Knitting and quilting have been keeping me occupied while waiting for my due date (which is February 18, in case you were curious).

The big news of today is...I'm finally done with the Snowball Quilt!! Does anyone even remember this thing? It's been through a lot. Packed and moved, sat all over by the cat...I had planned this as my first large quilting project, and began sewing precisely one year ago. Originally I had ambitiously wanted to make it a queen-sized quilt with a two-coloured border, but I got so sick of cutting out the pieces that I decided to truncate it into a lap quilt. Turns out that it makes a nice crib-sized quilt too, so it's going to be for J.J.'s room.

The octagon design is traditional quilt pattern called the snowball. I first decided I wanted to use this pattern after seeing an amazing Kaffe Fassett quilt of a similar design (although I selected quite different colours). To assemble each snowball, you need one 5" square and four 1.5" squares. You place a small square in each corner of the large square and sew along the diagonal of the small square. Marking this with a pen probably helps, but if you're lazy like me, you can just eyeball it. Then you iron out the small squares to get the nice octagon shape, and trim the excess off the corners. You end up with many, many little scrap triangles...whether they can be used is up to you...if you're willing to work with such tiny pieces go for it! I have mine stashed in an envelope in case the urge ever strikes me. So far it hasn't.

The actual quilting was done on the machine, in rows, stitch-in-the-ditch. You can see some hand-quilted circles in the octagons, which I was working on whenever watching an episode of Lost and needing something to do. I think the Fassett quilt had circles that were machine-stitched, but I chickened out of doing this since I don't have much practice doing curves. Hand-quilting looks beautiful, but is painstaking work. Especially stitching circles. Over several weeks I only managed to do about 20 circles, and there are about 80 in this quilt. I am considering this quilt done, although I may go back and add a circle or two here and there if I feel like it!

The backing was cut 1.5" larger than the quilt top so that I could cheat a little on the binding. Mine's a fake binding...it's just folded over and sewn down using a blind hem stitch. From the front, you can't really tell though, since the thread matches the border pretty well.

All the fabrics I used came from Joann's, which has a decent selection if you are persistent in your hunting. Next time though, I think I'm going to try some online fabric shops that sell more interesting fabrics that I learned about through these nifty quilting blogs:

Oh Fransson!
Bison Girl

Now I'm working on a Flock of Triangles quilt in red and white! I saw one in deep blue and white and it looked gorgeous...but I'm on a craft diet and not allowing myself to buy new stash until I've used up a good deal of what I've already got.

Monday, January 18, 2010

Stacked Coins Baby Quilt

Ta-da!! The Stacked Coins Baby Quilt is done! Yay! I love how it turned out! This is a really simple, straightforward pattern for a beginner quilter and the size is also perfect for a not-too-daunting project.

First time at doing mitered corners!

I was able to finish it over four days, working on it about half a day each time. The binding was a bit fussy to do because I finished it by hand, but it looks clean and tidy that way. I also got better at the free-motion quilting as I went along, although it took much longer than I would have guessed. Plus it ate up nearly a spool of thread! I like the look of the squiggly bits over top of the rectangular design...I think straight lines would have looked a bit boring.

Here's the quilt sandwich pre-quilting:

Here it is after. I took this picture last night in bad lighting, sorry:

All you really need is about 1.5 yards of fabric in at least 2 colours for the sashing and backing, plus a few fat quarters to make your coin strips with them. There are 22 coins in each strip, each coin cut to 2.5" x 5" and sewn with 1/4" seams. Now, I think of myself as a decent sewer...I can sew tidy, even seams, install invisible zippers, you know, all round proficient enough. But my coin strips didn't line up AT ALL with the sashing when I was done. Even if you're off by a millimeter it adds up when you iron things out and try to get them lined up. Not a big deal, but it's not perfect. Some chop chopping solved that problem (but I guess I can't do that for more complicated quilting designs). For quilts to turn out beautifully, you have to be ultra precise...when all the corners and seams match up, it looks amazing.

I bet this will fluff up nicely in the wash!

Friday, January 15, 2010

Baby Quilt

I'm still here! Blogging had to stop all week because our camera batteries died, so no new pictures...but I ordered some new rechargeables that arrived last night!

This week I suddenly had the urge to make a baby quilt. I started a quilt ages ago, but it's just been hanging out unfinished because I can't decide how to quilt it and what colour backing to make. So, I went online to look for an easy baby quilt pattern. There are so many great quilting blogs out there! I ended up spending hours browsing through them, and admiring all the beautiful quilts...I thought this Stacked Coins quilt by Crazy Mom Quilts was super cute and didn't look too hard, so I made it using some pretty blues and yellows I bought a while back.

So far so good. There are a couple of booboos, but I'm learning as I go. For one, it was a LOT harder to line up the coins than I expected...I thought I cut everything carefully and stitched 1/4" seams on each one, but they turned out as all different lengths! Plus, when I put the cream sashing on (the strips between the coins), I somehow ended up with very uneven edges that requiring some heavy duty trimming. In some cases I had to trim off a whole damn coin. Grrr.

I wanted to try free-motion quilting on this project, so I've been practicing on a little square. It's rather tricky...you have to control the fabric with steady hands and maintain a steady speed on the pedal. It's kind of like learning to drive again, trying not to accelerate or brake too suddenly and not jerk the wheel around. It's turned out pretty well, but I can definitely see my learning curve from one end of the quilt to the other. I have about 1/4 more to quilt, and then I'm moving onto binding!

Friday, February 20, 2009

I finally started quilting...

Indeed I did! I finally overcame the quilting inertia... I'm following the basic idea for the snowball quilt in Kaffe Fassett's Kaleidoscope of Quilts

Are you thinking the same thing as me? It's bright, eh? I'm hoping it will look less kindergarten-decorationish when it's all sewn up. It took me the longest time to choose a pattern because there are just sooo many to look at...of course, it was my own fault for looking at so many books at once, but I like having lots of options.

The cutting was done over two days, which could have gone faster if I just focused on doing that instead of arranging the squares as I went along...a difficult task, I have learned. And then I ended up spending ages rearranging them all over again. When you stare at so many colours for a long time, your eyes start playing weird tricks on you and you lose your sense of design (I do, anyway), so D had to help me finish up as Gatsby sat on the squares, getting them all hairy.

So, each octagon is made by sewing four small squares diagonally from corner to corner, then folding it over and trimming the excess bits. That means LOTS of little bits. Maybe I can use them for something...? It would mean teeny teeny work though...

I've finished three of these strips so far, each one 13 octagons in length...another twelves strips await. I'll probably add a big border around it so that it will be a queen-size quilt. I'm hoping to finish before next Wednesday since we'll be having people over that night, and I've got to be all cleaned up. I'm staying home all day today, so I should get a lot done. After that, I'll have to think about how to actually quilt this thing. Likely by hand.

Friday, December 7, 2007

Last Minute Quilted Coasters


Quilted coasters from Last Minute Patchwork and Quilted Gifts, one of the many beautiful and simple projects from this book. They are relatively easy to make, even if you've never quilted before. I ended up using just a standard presser foot on my machine because the walking foot was the wrong size (ordering it in would have taken 3 weeks - how can I wait that long?) and I think they turned out just fine.


The nice thing about this project is that as long as you are using coordinated prints, you can just cut and sew as you please and then later match the coasters together any way you want. I think I'm going to go test drive the coasters now... curl up with a cup of tea and munch on some shortbread cookies.

Tuesday, October 30, 2007

Amish Weekend

Back from our first road trip! The weather was fantastic and made for a beautiful autumny experience. On Saturday we visited the towns of Sugarcreek, Walnut Creek, and Bolivar and met some lovely people along the way. First we stopped by the Sugarcreek Artisan's Mercantile (and town gym) and received some suggestions for how to spend our day. We went to the Alpine Hills Museum and had an authentic Amish meal at Beachy's Restaurant. After, we took a tour of an old working Amish home and ate some delicious fry-pies..mmm. There was a newborn baby horse - apparently no one knew she had been pregnant! There were some cute donkeys, sheep, Shetland ponies and piggies too.

Some fabric from an Amish quilt shop:


Yesterday I stopped in Joann's to pick up a couple of supplies, and an hour later, walked out with some mini alphabet stamps, textile paint, 2 yds of muslin, a walking foot for my sewing machine, and some quilt batting. That store is so overwhelming. I wandered aimlessly around the quilting section thinking I'd like to buy some quilting cotton, but had to give up because I didn't know how much and what colours I wanted to buy. Even after one settles on a colour theme, there are endless prints and patterns to select from. My anxiety dissipated as soon as I left the area.

The stamps were inspired by Whispering Pine's wonderful crafts - her attention to detail is incredible and her projects are so professional and classic. Although I don't know what I'll be stamping just yet, having these stamps make me feel like I too, can create similar wonderfully detailed crafts. What's silly is that I already owned some alphabet stamps but sold them at my yard sale thinking I would never use them again. I was wrong. Every crafter needs a set of alphabet stamps.

As if I don't already have enough hobbies, I am going to give quilting (basic basic quilting, it may not even involve joining two different fabrics together) a whirl. The foot and quilt materials are for the coaster project from Joelle Hoverson's new Last Minute Patchwork & Quilted Gifts book.


Not sure when I'll get to start this though, as I'd like to finish a few more projects I started earlier (second apron, jacket, monkey socks. . . the list is embarassingly long). Happy crafting!