Showing posts with label Pottery. Show all posts

Monday, August 24, 2009

Knitting and Pottery

Spending a week in Deep River was not only very nice family time, but very productive crafting time. There was lots of knitting and pottery, along with some good beaching, kayaking and swimming. And some good butter tarts.

I started the worsted-weight Amelia cardigan by Laura Chau, using Valley Yarns Northampton in Ocean Heather. It'll be fall before you know it, and I'm getting a start to my cooler-weather knitting. One skein has so far gotten me through 1.5 sleeves, which is good because I only have four more skeins left. I think I'll make it.

We tagged along to the pottery studio and played with clay while D's mom worked on new pieces for her display at the Valley Artisan's Guild (click to see some of her work!). Inspired by a photo, D made this cute Trojan horsey donut on wheels:

I managed to throw two rice bowls in a row that looked decent, despite not having been near a wheel in a year! Those cylinders, I tell you...I think it was a plot to prevent us beginners from making too many pieces and crowding the kiln.


I asked D's mum for a brown glaze with ash spots that I think will look really cool, here's hoping they turn out!

Today is the first day of school at D's college, all the eager young kiddies coming to class, probably terrified and getting lost on campus left and right. It made driving a pain in the arse because they were all J-walking all over the place. I told D he should really give them a good scare and tell them how hard his class was going to be...hehe. Seeing as it's not first day of school for me, I am going to spend the afternoon knitting, cooking, shopping, and doing some general organizing. Salmon cakes are on the menu for tonight. No more liver for me!

Sunday, October 5, 2008

Deep River Mugs

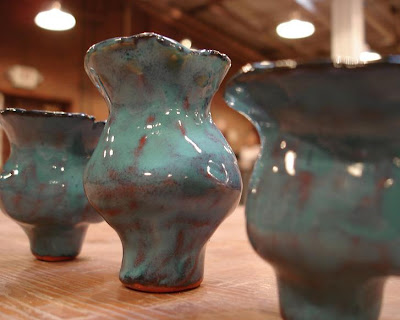
Last week D's mum mailed us our finished Deep River mugs - they turned out great! The glaze is looks so nice. Thank you, Alison! See here for pictures of the mugs before the glazing. I'm a little tired still, but since it's been so long since I posted something, I wanted to share something that didn't require too much chatter.

Ok. Here are the pottery pics:

D's glorious pencil jar

My morning coffee mug

The weather is gorgeous this weekend, so get out there and enjoy it while it lasts! Yesterday Z's bridal shower was actually outdoors in the sun (an unusual but welcome October experience), and we all went out for her stagette (a foreign word in Ohio) in the evening. Lots of fun, and there was a cake involved on my part - pictures to come soon.

This aftenroon we're heading out to try and see Bruce Springsteen on campus - maybe Obama will be there. Go Obama!

Wednesday, August 27, 2008

First Pottery Cylinders

After many months of mangled lumps of clay, I present to you....our first successful cylinders!!

My first mug!

On our visit to Deep River this past month, D and I got some pointers from D's mom (thank you Alison!) that really improved our cylinder-throwing. D's mom has been potting since last November, and her progress has been really amazing to see - her pieces are incredibly professional-looking with beautifully done glazes. I think she is just being modest about her work, because she pots with other experienced potters, but honestly they were much nicer than the pieces we have seen in our classes. Particularly the glazes. I can't get over how great they looked. I hate glazing. Well, I don't really. But it can be very frustrating when things don't turn out how you expect. It's all part of the learning process.

D's pencil jars

Anyhow, their house has become something of a ceramics gallery of pitchers, planters, casseroles, lidded jars, tea pots, mugs, bowls, plates, and various serving ware. D and I kind of looked at each other and were like, "how is it possible we have been doing pottery for nearly just as long?!!" It was definitely very inspiring, and we're both excited to go back to our next session of pottery. For those of you that don't remember, we were struggling with having to throw five 10" tall cylinders for class. We are determined to conquer our cylinders!

We also played around with throwing off the hump, a technique in which you plop a giant mound of clay on the wheel and only concentrate on centering the small portion on top to make small objects. It is much easier to centre using this method. Here's a little vase I made:

That's it for now...more progress in September. Next up: some sewing goodies.


Monday, July 7, 2008

One of those Progress Posts

Since returning from our vacation, I have more or less been a woman of leisure, meaning I'm not scheduled to go into any workplace, although I don't knock being a homemaker - it's lot of work - like making D's lunch every day (he's so spoiled). The bakery didn't need me the last couple of weeks, and there was only one weekend where I helped decorate my first wedding cake! I'll have to ask first before I post any photos. Aside from that, I've gotten back into crafting full swing. One Pomatomus sock nearly finished:

Some secret blue knitting with a little intarsia going on:

My best glaze job yet: glazed coil jar with lid (unfortunately it was fused together while firing). I painted white slip dots before bisque firing, and dipped the whole thing in blue after that.

D's ultra-blue pitcher that weighs about 8 lbs. To get it nice and bright, he painted it during leather hard stage with blue slip, and then post-bisquing, he glazed it with aquamarine. He is proud of the glaze job, though somewhat displeased with the child-like quality of the craftsmenship (heehee):

D's tulip vase he made by joining two pinch pots into a ball, then paddling the sides, finishing with a few incisions on top to get the little petal edges. The pot was first dipped in black satin, then overlapped with opalescent glaze. Very nice indeed.

We're still attending pottery classes, although it's been quite a while since I posted anything about our wheel-throwing progress. That is because we are still throwing pieces of poo. Neither of us have thrown a 10-inch cylinder (although we've come close a few times). I was ready to throw the clay across the room last week I was so frustrated. Instead, I exercised self-control and decided to practice throwing smaller lumps of clay, which actually helped a lot - when there is too much clay, I end up crumpling it before I've even had a chance to pull up a decent wall. Last class I was able to get an evenly-thick wall, which was pretty damn exciting. D is a little better than I am, so I think he'll be on his cylinders sooner than I. Maybe I'll try to convince the teacher to let me make tiny little bowls...

In other exciting news, D and I have finally rejoined the world of bicycle commuting! Check out my shiny new blue bike!

After being sans bike for over a year (mine fell victim to tire theft, D's was an old clunker with no gears) and with the summer weather, we'd been wanting to replace our bikes for a while. After shopping around a little, we bought them from Handy Bikes USA, a fantastic little shop with lots of comfort bikes on 5th Ave in Grandview. I'd highly recommend them. Apparently they've sold over 2000 bikes this summer, up from the 1500 they usually sell - probably because of the soaring gas prices.

This morning we took them out on their first ride. Don't worry, we were wearing helmets. Even though it made us look silly. We're responsible like that. Good for the muffin tops, good for the environment, and good for the wallet. I feel so environmentally urban chic. I'm thinking of getting some accessories for it, like a basket. Happy riding!

Thursday, May 15, 2008

Pottery Week 10 & 11: Wheel-throwing

I know you have all been dying to see my lovely thrown pottery. After all, I do call myself Knitticrafty and seem to be quite competent at most crafts I pick up. Especially after our successful first wheel-throwing attempt back in December when we visited Deep River.

Well, it turns out that was mostly beginner's luck... last Saturday D and I had our first throwing class, and we went again on Tuesday night. Our instructor gave us a demo on the wheel, and ziipp ziiipp ziiipppp in three easy motions managed to pull up a decent looking pot! Wow! I was encouraged. The steps were: cone up & down, form the base, pull up the side. To master the techniques of throwing, each student in the class must be able to throw five 8" tall cylinders of consistent thickness in order to begin making and keeping thrown objects. D and I each started with four good-sized balls of clay to practice with. Off we went!

Here are my first two tries. Oh dear.

Wobble bobble...

Centering the clay is one of the most challenging steps and it is essential that you be able to centre your clay constantly to prevent wonky looking messes like this:

Practicing making spouts on my third mangled pot

After about 3 balls, my arms were feeling pretty wimpy so I packed it up. D however, persisted and seemed to do quite well for his first try! Here he is, pleased as punch.


The best pot of the day

This is why we're not allowed to keep anything yet...

Tuesday night saw some improvements, with both of us managing to get our cylinders a little taller (6"), but they would all somehow end up too thick at the bottom and too thin on top. One woman in our class completed her 5th cylinder that night, and there was a lot of whooping and cheering. Since we spent all our time throwing, glazing our other pots were put on hold. I did get my pear back, which turned out to be a surprising shade of brown instead of the nice greenish colour I'd thought I'd chosen. Glaze is such a mystery...

A nice Bosc pear instead of a Bartlett.


Saturday, May 3, 2008

Pottery Week 9 - a Mishmash

Lots of fun things this past week! Viennese chocolates and fancy tea arriving in the mail were a lovely surprise (thanks Hazel and Kevin!) We were FINALLY reimbursed for our lost valet parking key (only 3 months later). I also went to my first jewelry class, which was a bit weird since I was the only new student. I did, however, briefly wield a blow torch, flame some copper, dunk it in some 'pickle' (an acidic solution - thereby annealing it) and practice some stamping without injuring myself. Our first project will be a slot and tab bracelet, which I am supposed to draw for homework. Unsurprisingly, I haven't done it yet.

Today, D and I started the second session of our pottery class. We did a bit more hand building - slabs and pinch pots - and next week we'll be learning how to throw on the the wheel! Very excited for that. Here are a few pictures to entertain you with:

D made these lovely little vases by pinching two bowl-shapes, joining them together and sealing them to form an enclosed oval. He paddled the sides with a wooden stick tool to create the sections. Unfortunately, only one survived the transport to the drying shelf - again reflecting the delicate and frustrating nature of pottery work.

I made a few more slab pots using molds, which I am planning to slip-paint next week:

After class, we had some excellent sandwiches at the Brown Bag Deli in German Village, followed by coffee and sweets at Yosick's Artisan Chocolates and pastry shop. On one side of the shop they had a nice assortment of self-serve traditional bakery goodies including cookies, macaroons, cupcakes, scones, turnovers, biscotti, brownies and more. I had a raspberry lemon friand and D had two mint chocolate truffles (which he said were fantastic) - they make all their chocolates on premises using only Belgian chocolate and adding caramel or honey to sweeten. The owner does all the baking herself as well. Drop by for a coffee and treat!


Then tomorrow, I am going to see a Bunny show at the Ohio Expo Center and possibly an alpaca show too - I am secretly hoping to find to soft angora or alpaca yarn to take home with me.

Sunday, April 20, 2008

Pottery Week 8: Finishing Up

This Saturday was our last pottery class for the session, but we will be coming back for the next session and continuing to learn new skills (slabs, glaze effects and perhaps throwing). The kilns had been loaded this week and we were excited to see the results of our first glazing efforts. Our reactions were a mixture of intrigued/appalled. Glazing is a real art in itself, and as a beginner there is no real way to start to understand it unless you play around with it.

D's little pinch pots turned out a nice turquoisy-blue, fairly even. The stripes around the rim have all but disappeared except for the fine black line around the opening. He is quite happy with these pots.

I was surprised by the colours my pots turned out to be - I had forgotten what I applied, and wasn't sure how it would look over top slip paints. They look pretty kindergarten-y, but that's OK (you try making pinch pots for the first time!)

Glazing lessons learned: Although applying too much glaze will result in ugly running, you have to be careful not to apply too little glaze either. See how the blue glaze is barely clinging on? That's too little glaze. D and I were worried about over-doing it, and were a little too light-handed. I think my favourites are the little green shell and the taller mini vase, although the vase could have used a thicker coating of white matte glaze.

My pear pot and first coil pot were bisque-fired this week, so I worked on glazing them today. D didn't get to do any glazing today since his pots were still on the greenware shelf. No photos of those, but I glazed the pear with a yellow-grey glaze that looks like a pale green. The stem was covered in iron oxide to give it a dark colour under the glaze. If the whole thing turns out, I'll tell you how I glazed it. The other pot was dipped in plum glaze with an opalescent colour sponged over top. D spent the rest of class finishing an angular bowl and creating a pitcher-type object using little square cut outs and slabs.


Other than pottery, we saw Note by Note: The Making of Steinway L1037 at the Wexner Center on Friday night, which chronicles the making of a concert grand piano from wood selection all the way to final tuning. Really interesting stuff. Tonight we're going to a neighbour's place for dinner, which means I've got some vegan cupcakes to make this afternoon. Mmm.

Saturday, April 12, 2008

Pottery Week 7: Glazing, Coiling and more!

Happy Saturday again! Somehow D and I have suddenly made it to Week 7 (?!) of our pottery class, and I have only managed to blog about it twice. Pottery time flies. We missed a couple of classes due to the snow storm and running errands, and I found out that we only have one or two more classes left unless we register for the next session (we're definitely signing up). Having been introduced to hand building, we'll be learning about slab techniques and other finishes if we stick around for more. We may eventually get to wheel throwing, but for now we are both really having fun with hand building (shocker!)

Lots to show you today. We talked a little about glazing, which is a completely intimidating process by which you can really mess up your nicely made pots when you're a beginner. The glaze cannot be applied too thickly, otherwise it will run off the pot. There are infinite combinations of colours and finishes you can create by combining different glazes and slip-paints, and we were encouraged to try out different glazes on our pinch pots.

D's pinch pots with slip-paint only

My pinch pots, slip paint only.

Wet glaze colours also do not look anything like their actual, post-fired colour so if you're doing a lot of projects at once and layering the colours, you have to remember what colour you applied. Here, I can't tell you what these little pots will look like once they are fired. I know we used white matte, turqoise, honey, and foggy blue, and possibly some aqua glaze. The mystery makes it kind of fun.

Next, we worked on our coiled pots. So far the best coiling technique has been to roll out the coils as long and as evenly as possible prior to building up the pot. You can wet your work surface with the swipe of a sponge and roll your coil over that to keep it damp and pliable. There's no need to score the coils if they are soft and easy to smush at the seams. For our coil project, we are making a lidded jar with a lip.

D, starting to form the base

The coils can be formed in any style and then added to the pot

Slip painting the pot

The coils can be left as-is on the outside, or you can smooth the surface in any variety of styles. And to ensure a water-tight vessel, the inside coils need to be smoothed at the seams. Here's a third coil project I started:

My second coil project turned out to have a pear-ish shape, so I made a little lid with a stem, also by coiling. You add a lip to the lid, slanted slightly inward, and allow the lid to sit in the jar as it gets to the leather hard stage so that it shrinks together the same way.

My happy pear jar, which I will hopefully not mess up with glaze

Saturday, March 15, 2008

Pottery Week Two: Coil Pots

This morning D and I once again dragged our tired selves (I swear, I still haven't adjusted to daylight savings) to our second pottery class to learn more basic clay skills. One of the students in the class (who took her first beginner class 12 years ago!) taught us how to do coil pots, which turned out to be more fun and interesting than expected. The instructor was somewhere in the studio, but with so many experienced students around you can ask questions to pretty much anyone, which is nice ("Oh, beginner? Week 2? You're doing coil pots then" and she set us up on that). The instructor came around occasionally and praised our coiling efforts. Apparently we were doing well. It was a validating morning.

Before this class I thought coiled pots were pretty ugly unless you could make the coils beautifully even, which seemed like an impossible task for a beginner. Little did I know that coiling is also a way to build up height and do a rough sketch for your piece, after which you can then refine, smooth, or carve it however you want. You roll out a base shape, roll out a little tube of clay, score the edges you want to join together with a little water for glue, and then use a pointed tool to blend the seam from inside (and outside, depending on how you want it to appear) to prevent leaking if it's going to be a functional piece. Check out our coil pot progress:


Guess whose pot is whose?

And we did this all without having purchased our clay tools! All you need is clay, a plastic knife, a tub of water, and a popsicle stick (and D used a bit of string, which kept leaving fluffy bits in mine somehow). Next week we'll continue with our coil pots. I think I'll make mine taper in at the top. After class, we stopped at the library to pick out some pottery books to give us some ideas for next time.

In other news, I finished the Shetland Triangle and immediately cast on for another one in the Alchemy Bamboo. I've got pictures of that to post soon. Oh, and I had my second PIF person sign up! Have a good weekend.

Monday, March 3, 2008

Ceramics 101 at the CAC

Here's my first class report: D and I attended our first ceramics class this past Saturday at the Cultural Arts Center in downtown Columbus. It's a beautiful, large, and amazingly clean work space. At 9am, the studio was surprisingly busy - lots of attendees in this section already working on some pretty professional-looking pieces. Hmm. I thought this was beginner...

It turned out we were the only two beginners - everyone else had already taken a class and was registered in the section to use studio time (instead of a traditional membership, I suppose). Our instructor was lovely (and very chatty) and spent part of the morning showing us around the studio, getting us set up with our clay, and having us set forth on wedging (getting the air bubbles out) and making pinch pots to familiarize ourselves with the feel of the clay. We were told that the beginner's course would involve instruction on pinch pots, coiling, and slab work, and eventually throwing on the wheel depending on time and interest.

Admittedly, I thought 8 weeks of pinching, slabbing and coiling sounded like a drag. I was eager to get on the potter's wheel sooner than that. After shaping clay for 3 hours, however, using only my fingers and some texturizing tools, I was starting to understand why we go through this process -you begin to see how clay behaves as you pinch, flatten, stretch, pull, shape and poke it. By the end of class, D and I each made 4-5 little pots that should be leather-hard next Saturday, ready to be decorated some more.

Afterward, we had lunch at Katzinger's Deli in nearby German Village, and on the way out, bought a baguette from their bakery section. And hey! It was pretty darn good! Probably the best we've had in Columbus so far. Nice golden, crisp, chewy crust, and a dense, bubbly slightly chewy inside. After I got home, I toasted a few slices with olive oil and rubbed raw garlic all over them, with a little salt and pepper. Mmm, raw garlic.

The rest of the weekend was nice too, and relaxing. On Saturday night I had dinner at Spagio Cellars with the girls, and on Sunday we walked through the Short North and had a coffee. I almost bought a ridiculous looking gold polka-dotted dress on sale but finally decided I probably wouldn't have anywhere to wear it. We didn't end up going to the Arnold's fitness convention, but I'm not that sad about it. Today I have the day off, so I'll be doing some more baking, and then going to ballet class.